Upper Balgowlah Heights balcony looking out to palms, jacaranda and the pool below after refurbishment
Balgowlah Heights

Refurbishment of Three Balconies in Balgowlah Heights

Outdoor 10 weeks $220K – $240K
Project type Outdoor
Duration 10 weeks
Price range $220K – $240K
Completed November 2025
Overview

About this project

Full refurbishment of three balconies at a Balgowlah Heights home. New waterproofing, pedestal pavers, Starphire glass balustrades, VELUX skylights.

A project like this typically ranges from

$220,000
$240,000

Scope of work

  • Full refurbishment of three existing balconies
  • Demolition of existing tiles, bedding, ceilings and balustrades
  • Optiseal OC2100 sheet waterproofing membrane
  • Membrane protection and drainage layer
  • Maximus Junior adjustable pedestal paver system
  • Starphire toughened glass balustrades (45m) with chrome handrail
  • Aquachek moisture-resistant plasterboard ceilings (95m²)
  • New balcony drainage and stormwater connections
  • External downlights with motion and daylight sensors
  • Three VELUX FCM fixed skylights above the top balcony
  • New Colorbond roof over the first-floor balcony
  • 5kW split system air conditioner to lower rumpus room
  • New front door and frame
  • Structural engineering review and remedial framing

The renovation story

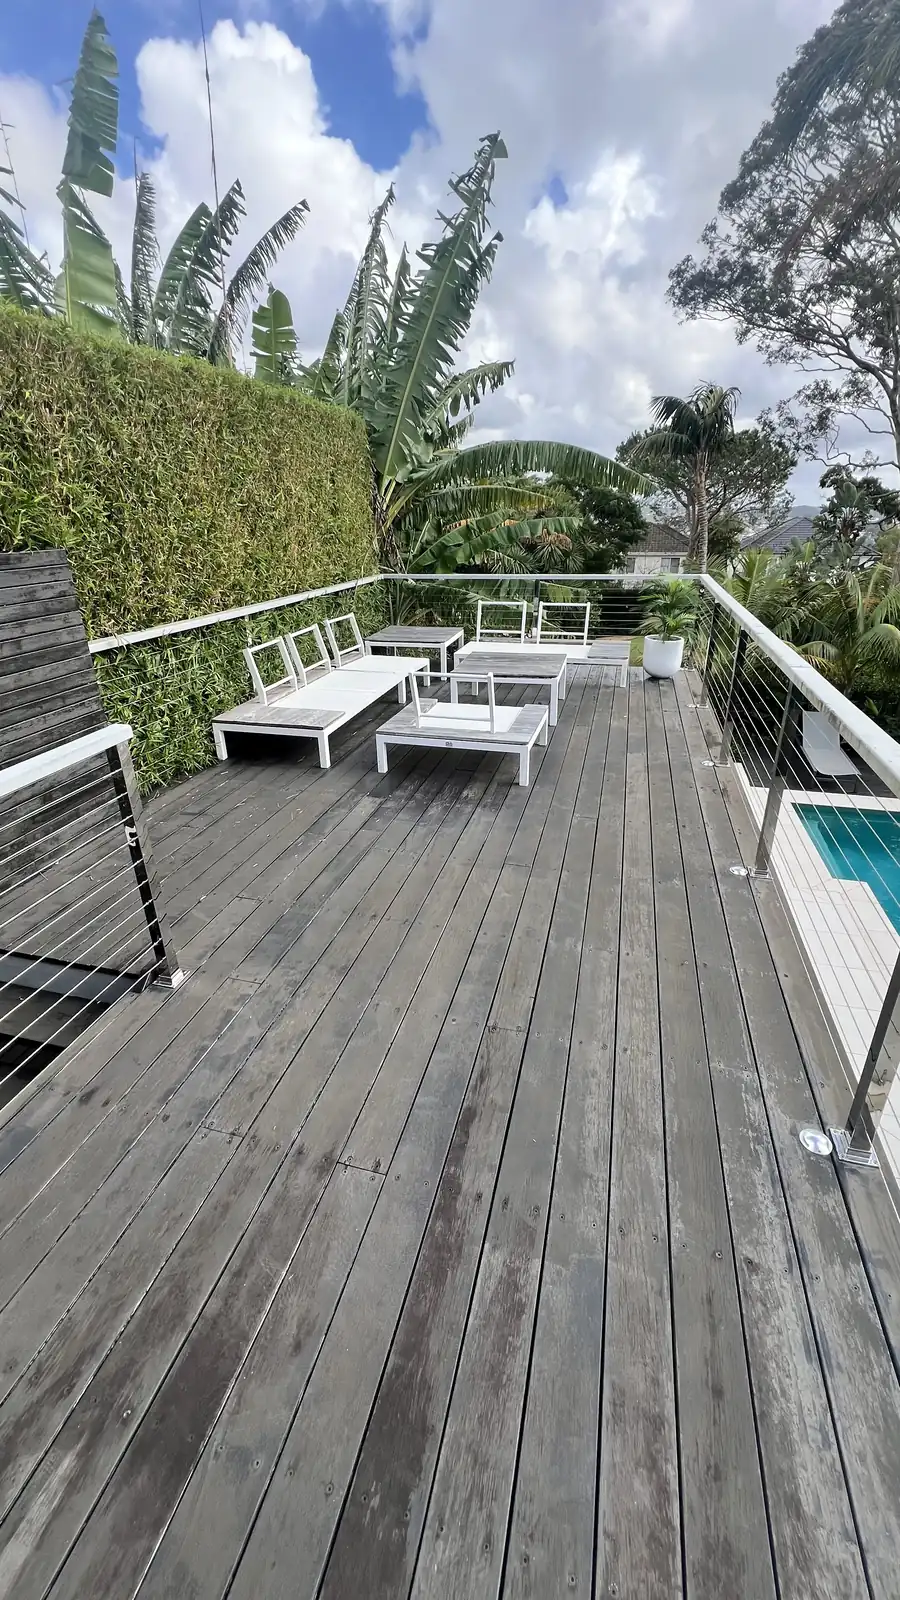
This Balgowlah Heights home had three existing balconies that had quietly reached the end of their service life. The tiled surfaces sat flush with the internal finished floor level, there was early evidence of failed waterproofing, and inspections suggested there was no proper screed bedding beneath the existing tiles. In older Sydney homes, this combination almost always means the original falls and drainage were never set up correctly and the membrane underneath is already compromised. The owners wanted the balconies rebuilt properly, not patched.

The project started with scaffold setup and a clean, staged demolition. Around 65m² of external tiling, 35m² of decking, 45 linear metres of combined glass and stainless steel wire balustrading, and 95m² of plasterboard ceilings beneath the balconies were all removed back to the timber frame. A structural engineer then inspected the exposed framing and confirmed the appropriate waterproofing and remedial approach. Remedial carpentry was carried out wherever rotten or non-compliant framing was found, and new framing was built above the first-floor balcony to support a new roof and three skylights. For more on how we scope and manage a project with unknowns like this, see how we work.

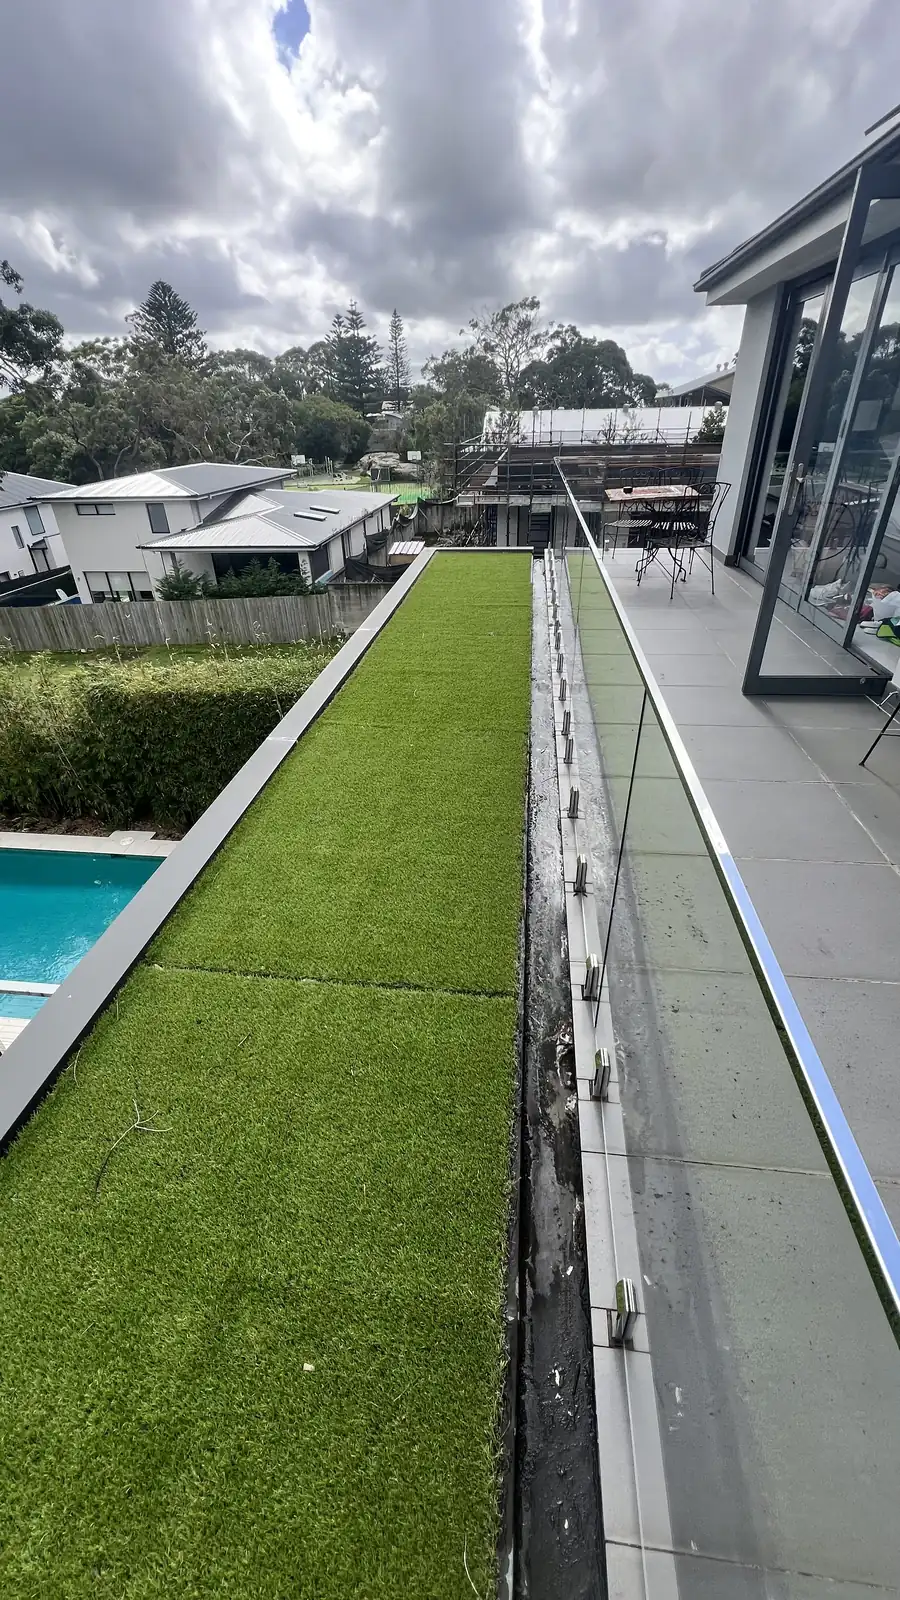
With the frame sound, new drainage was installed through the floor framing and tied into the existing stormwater system, which the original balconies never had. An Optiseal OC2100 sheet waterproofing membrane was then applied across all three decks, joints, wall junctions and drainage points, with a protection and drainage layer on top. A Maximus Junior adjustable pedestal paver system was set out over the membrane so water can drain freely underneath the pavers and the finished floor could be set perfectly level on all three balconies.

Around 45 linear metres of frameless Starphire toughened glass balustrading was installed with a chrome handrail, keeping the view to the palms, pool and surrounding gardens completely unobstructed. Underneath the balconies, 95m² of Aquachek moisture-resistant plasterboard ceilings were rebuilt and new external downlights with motion and daylight sensors were installed. Above the top balcony, a new Colorbond roof was built off the existing framing and fitted with three VELUX FCM fixed skylights to bring natural light into the space below.

Inside the house, the scope expanded to include a new front door and frame, and a 5kW split system air conditioner in a new bulkhead to the lower rumpus room. If you have an older balcony that may need similar work, get in touch or book a free planning call and we will take a look.

Thinking about a similar renovation?

See how we work
The transformation

Before and after

Top balcony

The original top balcony had tiled surfaces sitting flush with the internal floor level, which is a common red flag for older balconies. With no step-down to shed water and early signs of failed waterproofing, the tiles, bedding, ceilings and old balustrading were fully demolished back to the timber frame. A structural engineer reviewed the exposed framing, remedial carpentry was carried out where needed, and an Optiseal OC2100 sheet membrane was installed with a protection layer. The final surface sits on a Maximus Junior adjustable pedestal paver system so water can drain cleanly underneath the pavers, while the new Starphire glass balustrade keeps the view completely unobstructed.

Original Balgowlah Heights top balcony with failed waterproofing, dated tiling and old balustrading Before
Refurbished top balcony with pedestal pavers, frameless glass balustrade and open district view After

Middle balcony

The middle balcony previously had stainless steel wire balustrading that had aged out and a plasterboard ceiling below that had absorbed moisture from the failing deck above. All three levels of balustrading (around 45 linear metres in total) were replaced with frameless Starphire toughened glass panels and a chrome handrail. Underneath, 95m² of moisture-resistant Aquachek plasterboard ceilings were rebuilt. New drainage was installed through the timber floor framing and connected to the existing stormwater system, which the original balconies never had.

Original middle Balgowlah Heights balcony with old stainless steel wire balustrading and worn ceiling beneath Before
Refurbished middle balcony with frameless Starphire glass balustrade and chrome handrail After

Planning a renovation?

Client review

What our client said

FAQs

Common questions about this project

Answers to the most common questions about this renovation, including costs, timelines, and materials.

How much did this Balgowlah Heights balcony renovation cost?

The total project cost was in the range of $220,000 to $240,000 and ran on a cost-plus arrangement. That covered the full refurbishment of three balconies, including demolition, structural engineering and remedial framing, Optiseal OC2100 sheet waterproofing, a Maximus Junior pedestal paver system, 45 linear metres of frameless Starphire glass balustrading, 95m² of new Aquachek moisture-resistant ceilings, three VELUX FCM skylights, a new Colorbond roof over the first-floor balcony, a 5kW split system air conditioner to the lower rumpus room, a new front door, and all electrical, plumbing and drainage works. Older balconies with failed waterproofing tend to hide more work than they show, which is why we spec a structural engineer review after demolition. To see how we scope and price projects like this, read about how we work or book a free planning call.

Why did these balconies need a full refurbishment rather than a patch-up?

Two things flagged this as a full rebuild rather than a cosmetic touch-up. First, the original tiled surfaces sat flush with the internal finished floor level, which gives water nowhere to go and almost always ends in a failed membrane over time. Second, early inspections suggested there was no proper screed bedding beneath the tiles, which meant the falls and drainage were never set up correctly in the first place. Once we stripped things back, a structural engineer was brought in to confirm the condition of the timber framing and sign off on the waterproofing and drainage approach. This is a common story on older Sydney homes with timber-framed balconies, and it is why a proper inspection and clear scope matter before any work starts. For our approach to unknowns like these, see how we work.

What is a pedestal paver system and why use it on a balcony?

A pedestal paver system uses adjustable plastic or rubber pedestals (in this case Maximus Junior units) to support pavers above the waterproofed deck, leaving a small gap underneath. Water drains freely through the joints, across the membrane below, and out to the balcony drainage points. Because the pedestals are adjustable, the finished floor can be set perfectly level even when the slab or substrate underneath has falls built into it. The pavers can also be lifted later if the membrane ever needs to be inspected or repaired, which is a major advantage over traditionally-bedded tiles. The overall result is a level, durable and serviceable balcony floor that protects the waterproofing underneath.

What is involved in waterproofing an older timber-framed balcony properly?

After demolition, the timber frame is inspected for rot, damage or non-compliant framing and any remedial carpentry is carried out. Drainage points and falls are then set up so water is directed away from the building. A sheet waterproofing membrane (in this project, Optiseal OC2100 self-adhesive butyl sheet reinforced with nonwoven polyester) is applied across the deck, all joints, drainage points and movement-prone areas. A protection and drainage layer sits on top of the membrane to prevent damage during tiling works and to help move water to the drains. Only then is the pedestal paver system installed. The balustrade fixings, wall junctions and penetrations are also flashed and sealed so water cannot track behind the waterproofing. It is a multi-trade sequence that has to be done in the right order by people who have done it before.

How long did the balcony refurbishment take?

The project ran for approximately 10 weeks from start to finish. That covered scaffold setup, demolition of all three balcony floors and the plasterboard ceilings beneath, structural engineering inspection and remedial framing, waterproofing, new drainage through the floor framing, the new Colorbond roof and VELUX skylights above the top balcony, installation of 45m of Starphire glass balustrading, pedestal pavers across all three levels, new ceilings, electrical rough-in and fit-off, the front door replacement, the new AC bulkhead and split system in the rumpus room, a detailed clean and final handover. For more on how we sequence trades and keep a complex project like this on track, see how we work.

How do I know if my own balcony needs similar work?

The most common warning signs are water marks, bubbling paint or sagging ceilings in the room below the balcony, grout or tile movement, rust stains around drainage points, and any sign that the balcony tiles sit flush with the internal floor level. If the balustrade posts are rusting at the base or the handrail feels loose, that is another indicator that the fixings have been compromised by water. If you see any of these on a Northern Beaches or North Shore home, the safest next step is an on-site inspection so we can see what is happening at the substrate level. Get in touch through our contact page or book a free planning call and we will take a look.

Ready to start your renovation?

Talk to Cam about your project. No obligation, no sales pitch.